The onBalance Method of Starting Up New Plaster Pools
With More Durable Surfaces and Without Plaster Dust
Step 1 – Pre-testing the Water
- We Test the chemistry of the tap water that will be used to fill the pool. The key characteristics we observe are pH, Alkalinity, Hardness, Copper and Iron.
Step 2 – Calculating the Chemical Dose
- We Add the Alkalinity and the Hardness numbers together. Then we subtract that number from 500. The result is the amount of sodium bicarbonate in ppm to add. For example, if the fill water Alkalinity is 90 and the fill water Hardness is 200, then 210 ppm of new bicarbonate needs to be added: 500 – (90 + 200) = 210
- Then we apply the Simplified Dosage Formula for raising alkalinity using sodium bicarbonate: (Volume ÷ 71,400) x ppm to increase = pounds to add
- For example, if the pool will hold 20,000 gallons, and we want to add 210 ppm of bicarbonate alkalinity: (20,000 ÷ 71,400) x 210 = 58.8, or about 60 pounds to add
- If the total alkalinity and calcium hardness combined amount is 500 ppm or higher, then no addition of sodium bicarbonate is necessary.
- Note 1: It is important to have at least 120 ppm of alkalinity in the start-up pool water. This provides buffering in the event that any calcium hydroxide is released from the surface. That can happen especially with poorer quality plaster because of shrinkage/porosity, or when pools are filled too soon, before the paste is sufficiently hydrated. Although a bicarb start doesn’t completely compensate for poor quality plaster or for prematurely filled pools, it does mitigate some of the adverse effects.
- Note 2: The minimum combined TA/CH value should be at least 400. It is even better if it is closer to 500. The goal is an LSI near +1.0. That both protects the hydroxide-laden plaster surface and provides sufficient bicarbonate to convert hydroxide at surface to carbonate on contact.
Step 3 – Setting up the Delivery System
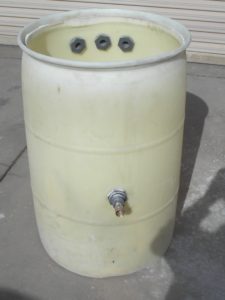
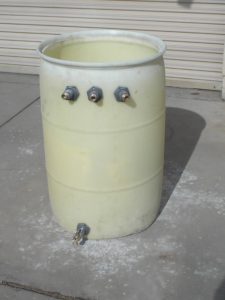
- We then set up a 55 gallon plastic drum that has garden hose connections added to it. The drums include the following modifications:
– An opening is cut in the top of the barrel to facilitate pouring in the bicarb.
– A female hose connector is mounted halfway up the “back” or “deck” side of the barrel – this is where the fresh water comes into the barrel.
– Three male hose connectors are mounted about 4″ below the top lip on the “pool” side of the barrel, enough to make sure that sufficient output hoses are provided to handle the pressurized input from the tap without overflowing the drum
– One fitting is mounted at the bottom of the pool side of the barrel, which leads to a valve – this is for draining the barrel at the end of the process.


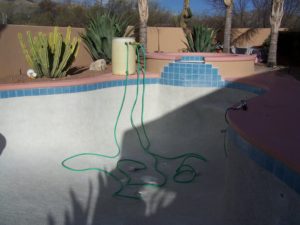
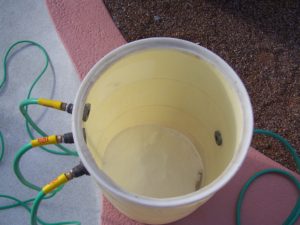
- To start the process, a hose is run from the home water source to the deck-side fitting, and three hoses are run from the top pool-side fittings to the bottom of the pool, with the ends wrapped in cloth and taped.

- Bicarb (we use technical grade sodium bicarbonate) is added to the drum before any water is turned on.

- After adding the bicarb, the pool is ready for filling. The water is turned on, fills the barrel, and gravity-flows out the three hoses into the pool. The powder will slowly dissolve as the pool fills. When the pool is full, the barrel is drained through the bottom pool-side drain fitting into the pool, and any remaining powder is rinsed into the pool.
Step 4 – pH Adjustment
- If the pH of the fill (tap) water is over 8.2, we add 1 quart of acid to the drum once the drum is full of water.
Step 5 – Determining Fill Delay, Turning On the Water
- In consultation with the plasterer, we decide when the water will be turned on relative to the crew finishing the pool. We encourage the plasterer to allow at least 6 hours between final troweling and turning on the water.
- At the pre-determined time, we ensure that the water is turned on and that the flow through the barrel to the pool is working properly, without leaks.
- Working with the homeowner, we ensure that the water fills uninterrupted from main drain to surface tile.
Step 6 – Making Adjustments
- Once the pool is filled, we double check the pH, which should be right at 8.3. This requires the use of a pH meter, since 8.3 is at the extreme high detection range of phenol red.
- We double check the Alkalinity, which should be anywhere from 100 to 350 ppm.
- If the pH is 8.2 or higher, we add acid to adjust the pH down to the high 7 range – 7.7 to 7.9ish.
- If the Hardness level is below 150 ppm, we add calcium chloride as needed, using the Simplified Dosage Formula for adding Hardness (see below). Be sure the pH is below 8.2 before adding calcium chloride.
- We recheck the copper and iron levels and add chelating agents as needed.
- We then add cyanuric acid, chlorine, etc. to reach to our target maintenance levels.
Step 7 – Monitoring the Progress
- Over the course of the next two weeks, we ensure that the pool is being brushed and filtered per the plasterers’ specifications, and chemically maintained per our standards.
- For the first month after fill, we allow the alkalinity to remain as high as it was from the start-up, and ensure that the pH remains at 8.2 or lower.
Step 8 – Final Balancing
- After a month, we begin adding acid until the Alkalinity reaches the target range.
- We aren’t in any great hurry to finish that – as long as the pH remains below 8.3, there will be no plaster dust and no scale formation.
P.S. For the first month of the bicarb program, it is better to use dichlor for sanitizing instead of liquid bleach or cal hypo due to the high pH effects of these products.
Simplified Formulas
Raising TA with Sodium Bicarbonate: (Volume ÷ 71,400) x ___ ppm desired change = ___ pounds
Raising Hardness with Calcium Chloride: (Volume ÷ 83,000) x ___ ppm desired increase = ___ pounds
(Amount in pounds to increase calcium hardness with 77% calcium chloride strength – use 101,700 as divisor for 94% strength)
